
Azure Linux VM Deployment with Terraform
In this article, I want to introduce you to Terraform, an Infrastructure as Code solution, helping in optimizing your Azure Resources deployments. You can access the VM template used in our example here on GitHub.
This article will be part of a 3-article-series:
a) Getting started with Terraform,
b) Guiding you through an Azure Linux Virtual Machine deployment,
c) Closing with a more complex deployment of a mixed IaaS and PaaS scenario on Azure.
The following topics will be discussed in this second article:
Terraform template syntax
Terraform deployment flow characteristics
Running and validating deployments
Terraform Template Syntax
If you read through the first article, one true benefit that comes to mind with using Terraform instead of ARM templates, is the easier syntax. But what does that mean?
Take a look at this example, showing a snippet of code to create a Resource Group and Storage Account:

Even if this is the first time ever you see the Terraform language, it should tell you this template allows you to deploy
a Resource Group called testrg in westus
A storage account of Standard type, GRS replication within the testrg resource group
Try to find that same information in the ARM template; it’s all there, but the syntax is way more complex and confusing to read through. Let alone to author from scratch.
You can find some more advanced sample Terraform templates here
This sample Terraform template file allows us to deploy a Linux Virtual Machine; let’s break it down and describe the syntax:
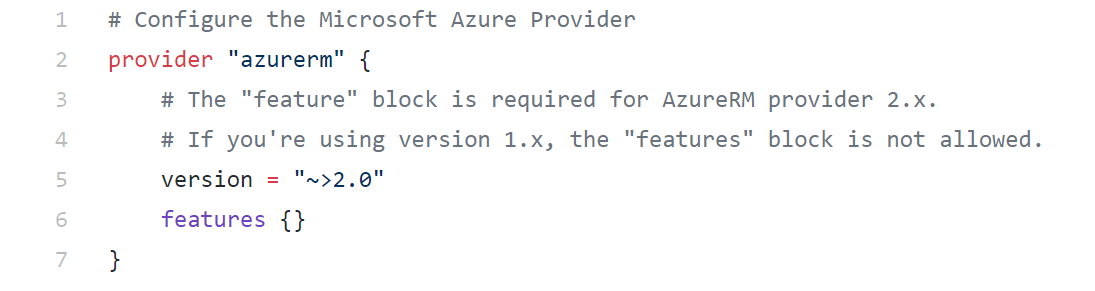
Lines 1-7
This is where you call the “Azure RM Provider”, telling Terraform what platform you are targeting, in this case Azure Resource Manager. (There are providers for AWS, Kubernetes, VMware,… and many more)
Since there are different versions of the Azure RM Provider, you can explicitly specify the version you want to use, to avoid conflicts or issues.
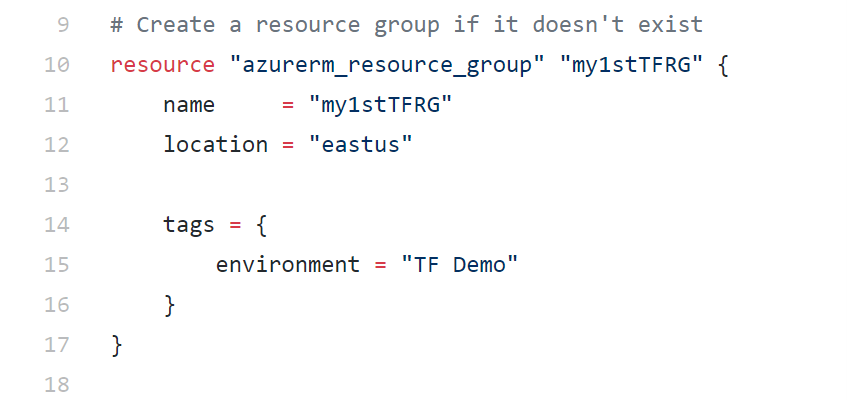
Lines 8-18
In this block, we specify the syntax to create an Azure Resource Group. The syntax keyword here is resource, where you target “azurerm_”, followed by the resource type name “resource_group”.
Next, you provide a descriptive name, as well as specifying the required (and optional, if any) parameters allowing the creation of the Resource Group, in this case name and location. Without these parameters, the Azure REST API will not allow the creation of the Resource Group resource.
Lines 19-30
In the next section, we define the Azure Virtual network. Notice how similar the syntax is to the previous blocks; azurerm_virtual_network is what we need as resource provider this time. Next, we specify the different settings we want to use for this Virtual Network like name, address space, location,…

Take a look at the remaining part of the Terraform-TF file, and once more get amazed by the logical syntax, the comments you can add, the readable structure,…
Terraform deployment flow characteristics
As you now understand the syntax, let us not hold you back and move over to one of the next interesting concepts of Terraform, the deployment flow.
Instead of just “running a deployment”, Terraform goes through the following stages:

Init:
This is the first step in the Terraform deployment sequence, running Terraform Init, where it downloads the necessary providers as per the Terraform file (AzureRM in our case), and initializes them.

(if you want to try this yourself, grab a copy of the LinuxVM.TF template from the GitHub link, store it in a subfolder on your machine, and run “terraform init” from within that subfolder).
Plan:
By running Terraform Plan, you start a “pre-flight” operation, where Terraform validates the template file syntax, as well as listing up all the “changes” that will happen on the Azure Resources (add, change, remove). More on that later on how it knows about that…

(from the same subfolder you ran init, you can now run “terraform plan”)
Apply:
After the pre-flight, if no issues are identified, you are ready to kick off the actual dpeloyment of the Azure Resources. Terraform Apply will once more list up all the upcoming changes, and waits for an approval (can be automated though). Once you confirm the apply step, the deployment starts rolling and resources will get created in Azure.

(last, run “terraform apply”, confirm with “yes” when prompted for it and see your deployments kicking off)
Destroy:
Terraform destroy allows you to remove any deployed resources, which got initially deployed through Terraform.
Terraform State File
Remember the Plan step from before, where I promised you some additional information how Terraform identifies the upcoming changes. If you check back in your deployment subfolder, you will notice a Terraform.TFState file. This is a logfile in JSON format, keeping track of the actual deployed resources. You can open this file in your favorite editor.
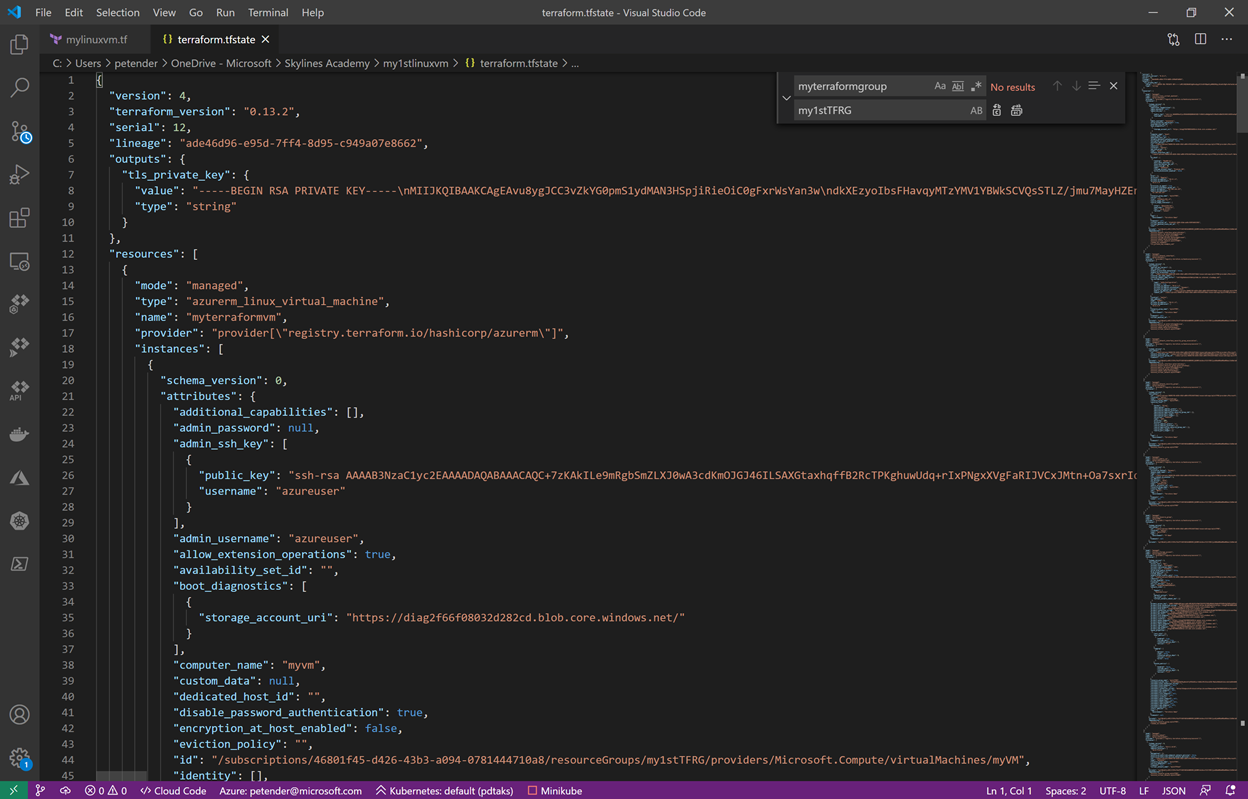
Whenever you perform a new “Terraform plan”, the deployment will validate the changes in your updated Terraform.TF deployment template, with the state of the TFState file. Any differences (add, change, remove) will be identified. Pretty cool, right?
Summary
Nice, you made it through the end of this 2nd article, and should now have a good understanding of the Terraform template syntax, as well as the Terraform deployment sequence, and how to validate your deployments from the Terraform State file.
In the 3rd and last article, I will describe the different Azure authentication methods, allowing you to automate your deployments even more, as well as walking you through an example on how to integrate Terraform into your Azure DevOps CI/CD Pipelines.

About the Author
Peter is a +20 year IT expert, with a background in Microsoft datacenter technologies. Since early 2012, Peter started shifting to cloud technologies (Office 365, Intune), and quickly jumped onto the Azure platform, working as cloud solution architect and trainer. Mid 2019, Peter took on a position as Azure Technical Trainer within Microsoft Corp, providing Azure Readiness Workshops to larger customers and partners within the EMEA Region and global, with a focus on Azure DevOps, Apps and Infra and SAP workloads.
Peter was an Azure MVP for 5 years, is a Microsoft Certified Trainer (MCT) for +12 years and still actively involved in the community as public speaker, technical writer, book author and publisher.
You can follow peter on twitter @pdtit and check his technical blog on http://www.007ffflearning.com