What is Azure Kubernetes Service
Azure Kubernetes Service (AKS) is Microsoft version of a managed Kubernetes cluster. It is used by organisations to deploy, scale, and manage containerised applications and has come a long way since it first became generally available back in June 2018.
If you are new to Kubernetes then it might be wise to have a look at this https://azure.microsoft.com/en-us/resources/videos/the-illustrated-children-s-guide-to-kubernetes/. It is the best resource to get a basic understanding of Kubernetes.
What are some features and benefits?
The main benefit of AKS is that Microsoft does all the configuration for the cluster creation, in fact it goes as far as managing the master node for us. The management of the master node is also given to us for free, we only actually pay for the container hosts, or nodes as they are commonly called and any storage. AKS also has nice easy integration with Azure Active Directory (Azure AD). This will allow you to manage access to your AKS cluster using Azure AD users and groups.
Azure advisor is integrated with AKS to help you optimise your deployments with real-time, personalised recommendations based on Microsoft knowledge from working with thousands of enterprise customers.
Azure Monitor also has some nice integration with AKS. You can enable this at cluster creation time or any time after and uses the same familiar tools any Azure Admin is used too, and if you are a more experienced user, they even have an easy way to pass the Azure monitor logs to Prometheus. Prometheus (https://prometheus.io/) is the best monitoring tool for Kubernetes, pair it with Grafana (https://grafana.com/ ) and you have some very powerful monitoring.
As AKS is a managed service when a new version of Kubernetes comes out Microsoft will make the version available to you as cluster admins. You can then choose when to apply the upgrade which is either a few clicks in the Azure portal or via the Azure CLI. You can very easily integrate with Azure DevOps and GitHub allowing you to create some powerful CI/CD pipelines for your applications.
When should you use AKS?
So, AKS usage is predominantly container-based application deployment and management, you can now run Azure functions on AKS, but they are packaged in a container.
If you are currently investigating a migration from monolith to microservices then you should look at AKS and Azure. You can easily integrate with other Azure services like Azure Container Registry (ACR), Azure Keyvault, Azure SQL, and as mention above Azure DevOps to create a very powerful Continuous integration (CI), continuous delivery/continuous deploy (CD) pipeline.
If you are just deploying a single container that does not need any features, you get with AKS then you should look at Azure Container Instance (ACI). This allows you to spin up a container on demand, say via an Azure logic APP once it has finished its purpose it will then stop. With ACI you only pay for the CPU and memory the container uses when it is running.
So, if you have multiple containers and want to go down the DevOps route have a look at AKS. If you just need to run a single container than look at ACI.
What about security and monitoring?
With AKS you can enable Role Based Access Control (RBAC) which can integration with Azure AD (only at cluster creation). This will enable you, the Azure admin to tailor access to the AKS cluster using Azure AD users and groups. You must deploy cluster role and role bindings on the cluster, so Kubernetes knows what group/user has access to what.
Azure Security Centre (ASC) can also be integrated with AKS. This will scan your cluster and alert you to any recommendations you are not following.
As mentioned above you can use Azure Monitor and more specifically container insights for all container monitoring or you can use tools like Prometheus. I really like Azure container insights. It is very easy to use and if you are familiar with Kusto Query Language (KQL) then you can create some powerful dashboards in Azure.
You also get Azure policy integration with AKS. This allows for dynamically enforceable guardrails to help keep you cluster secure and compliant with regulatory bodies such as ISO.
Next steps
Hopefully the above has helped you understand AKS and its benefits and now you want to create your first AKS cluster to learn more about it. The following will create you a nice and simple AKS cluster perfect for playing around with. Do not use the below example in production.
Create the Resource group and cluster
Open your favourite terminal app that has the Azure CLI installed.
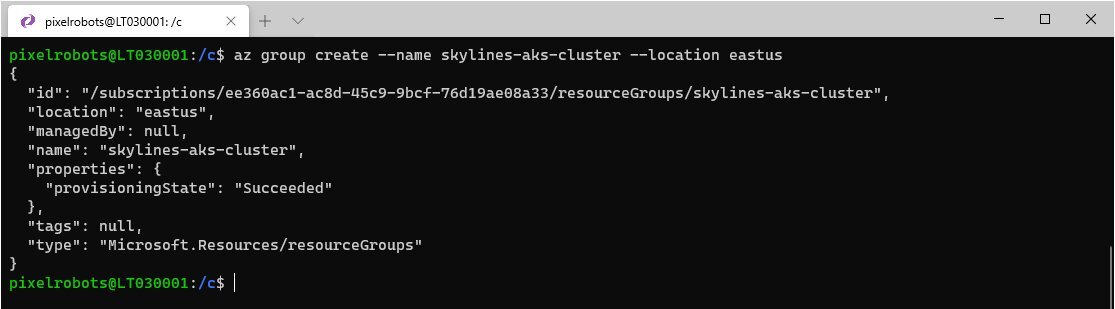
In here you will use the az group create command:
az group create --name skylines-aks-cluster --location eastus
With the resource created its now time to move on to creating the AKS cluster. For this you will use the az aks create command and create two nodes.
az aks create --resource-group skylines-aks-cluster --name skylines-aks-cluster --node-count 2 --generate-ssh-keys
After a few minutes maybe around 6 you will have your aks cluster up and running ready for learning on.
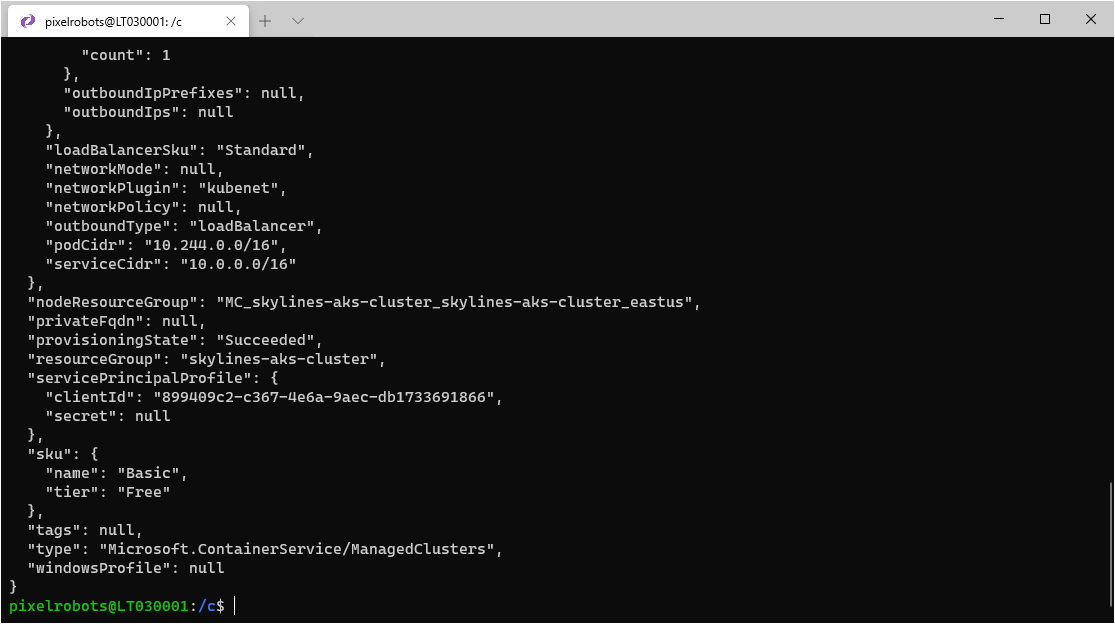
Awesome, so your cluster is built and ready for you to connect to it.
Connect to the cluster
To connect to the cluster, you will need to use the kubectl tool. To install this command line tool just use the following:
az aks install-cli
If you get a permission error just put sudo in front of the command.

Now that kubectl is installed you need to use the az aks get-credentials command:
az aks get-credentials --resource-group skylines-aks-cluster --name skylines-aks-cluster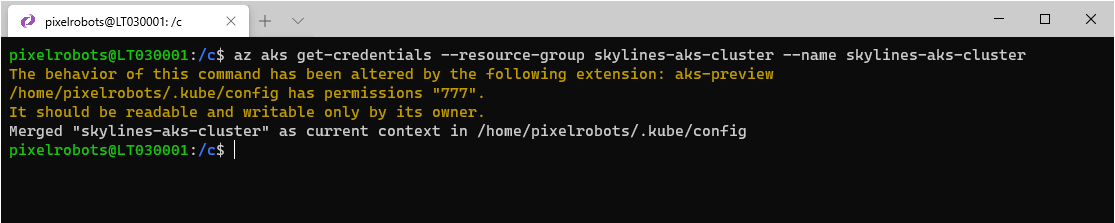
So, that’s you connected up to the new cluster. To communicate with the cluster, you will be using the kubectl command. The following command will get you a list of nodes in your cluster.
kubectl get nodes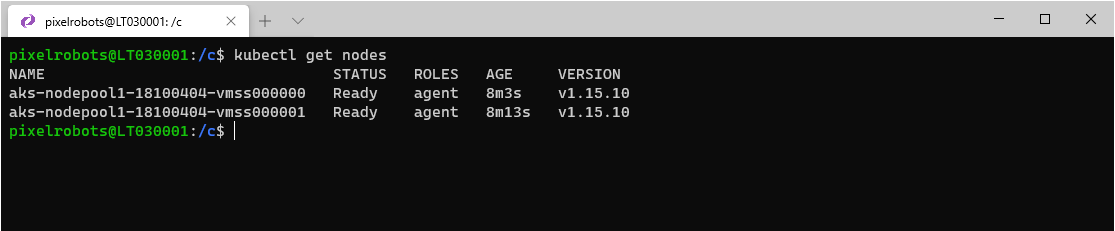
Now it’s time to deploy a sample app.
Deploy a sample app
For this we are going to use the below sample Kubernetes manifest file.
In VS code copy the below and save it as sample.yaml
apiVersion: apps/v1
kind: Deployment
metadata:
  name: sample
  labels:
    app: sample
spec:
  replicas: 1
  template:
    metadata:
      name: sample
      labels:
        app: sample
    spec:
      containers:
      - name: sample
        image: pull mcr.microsoft.com/dotnet/core/samples:aspnetapp
        resources:
          limits:
            cpu: 1
            memory: 800M
          requests:
            cpu: .1
            memory: 300M
        ports:
          - containerPort: 80
  selector:
    matchLabels:
      app: sample
---
apiVersion: v1
kind: Service
metadata:
  name: sample
spec:
  type: LoadBalancer
  ports:
  - protocol: TCP
    port: 80
  selector:
    app: sample
Now back in your terminal navigate to the location of the saved sample.yaml.
To deploy the sample app you are going to use the kubectl apply command
kubectl apply -f sample.yaml 
Good news; two things created. It can take a short while for the AKS cluster to pull the container image needed. To check on the status of the container you can use the kubectl get pods command.
kubectl get pods
Before I pointed out that two things were created. One was something called a service. This service allows you to have a public facing IP address for your application. To find the IP address, you will use the kubectl get service command (sample being the name of the service. To check what services you have just don’t include the service name).
kubectl get service sample
Now, in your web browser navigate to the external IP.
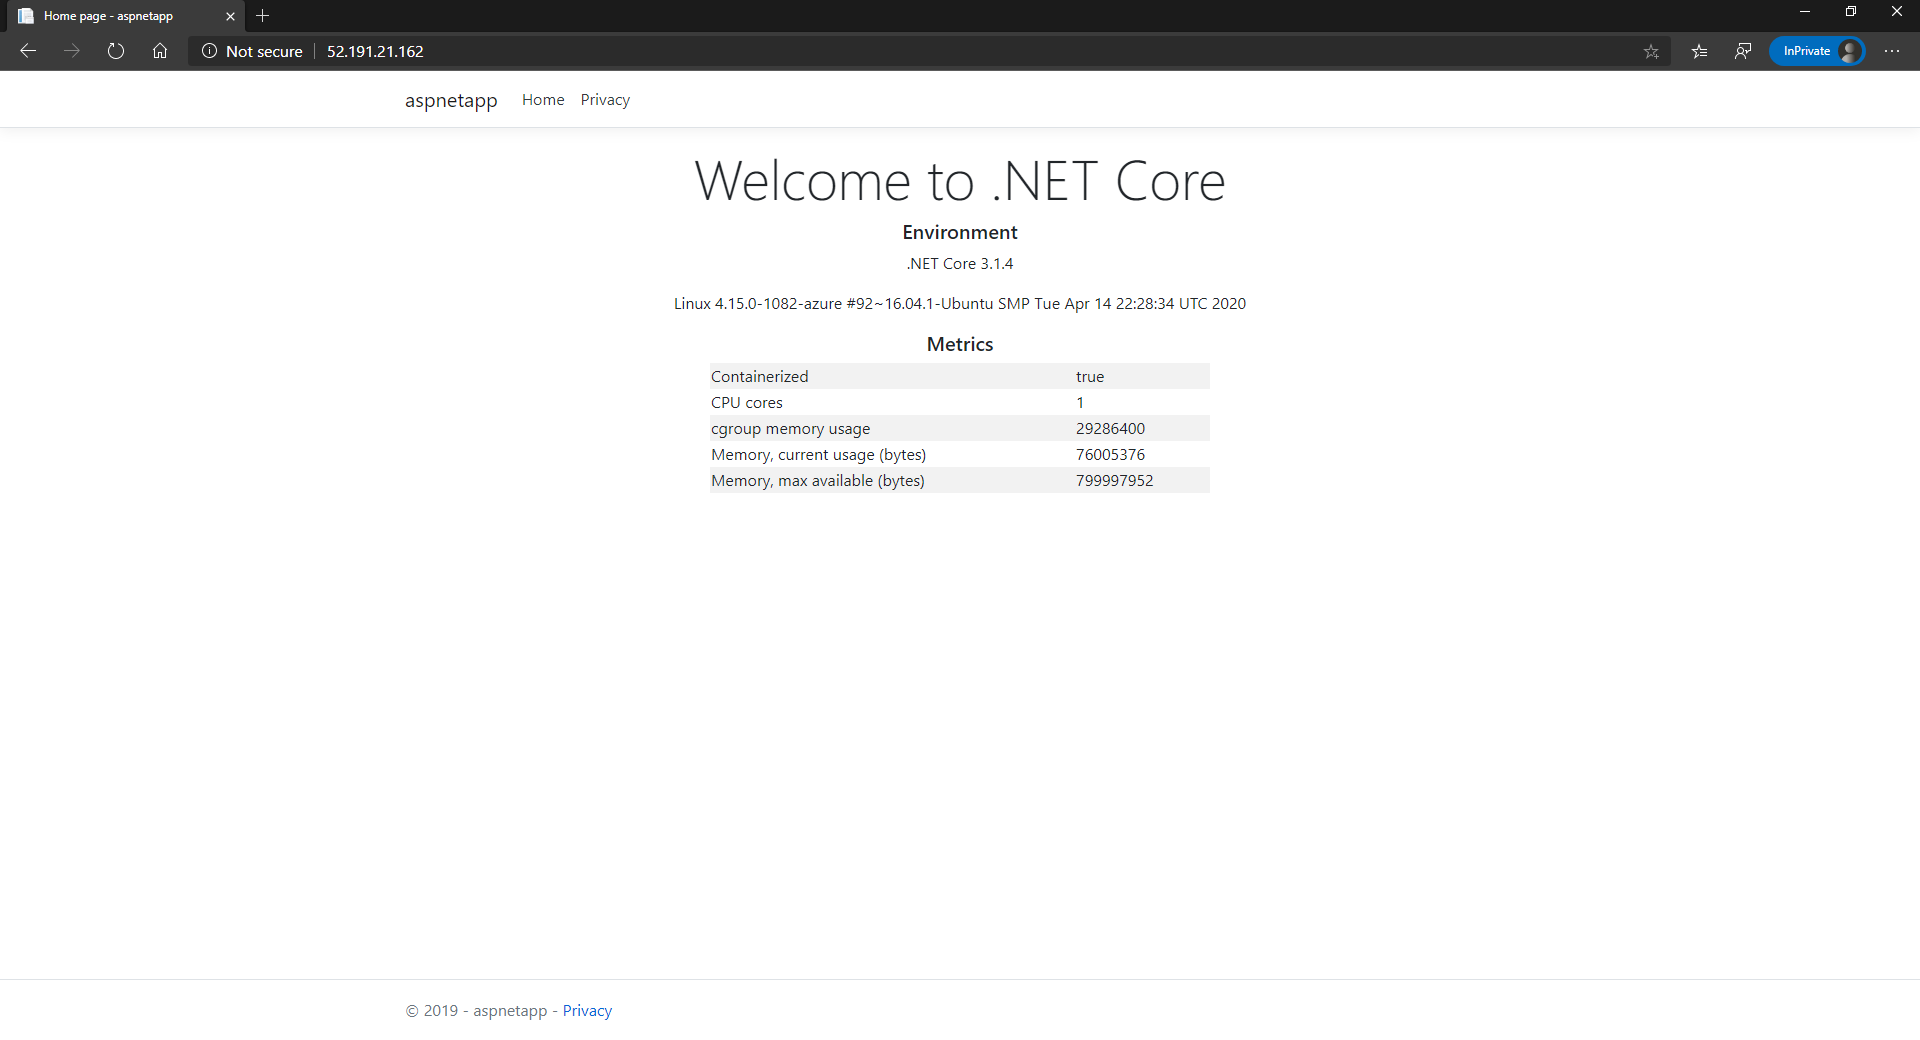
And there you have it, you have created an AKS cluster and deployed a sample application. Once you have finished learning what you can make sure you remove the cluster.

Richard Hooper
Richard Hooper is a Microsoft MVP with one of the top blogs at https://pixelrobots.co.uk . You can also find him on LinkedIn and Twitter